
Okay, I’ll admit it – when I first saw cheesy pickle things blowing up my feed, I rolled my eyes a little. Another viral trend, right? I’m usually one for classic comforts, but then a late-night craving hit, I had a bag of shredded cheddar, a jar of pickles staring back at me from the fridge, and… well, let’s just say my snack game was forever, unforgettably changed. These little bites are the real deal, folks!
If you’re looking for a ridiculously easy, insanely flavorful, and surprisingly guilt-free snack that hits all the right crunchy, cheesy, tangy notes, you have to try these. They’re perfect for movie nights, a quick appetizer when friends pop over unexpectedly, or just when you need a little something special that won’t derail your healthy eating goals. Seriously, prepare to be obsessed.
Why This Recipe Works (And Will Totally Wow You!)
I’m so excited for you to try these because they’re just fantastic, but here’s the lowdown on why this recipe is a total winner:
- Seriously Simple: We’re talking minimal ingredients and even less fuss. If you can turn on an oven and stir cheese, you’re pretty much set. No complicated steps, just straightforward deliciousness.
- Flavor Overload (In the Best Way!): That punchy sharp cheddar, the zesty dill pickles, and then a little whisper of smoky paprika and garlic? It’s a flavor explosion that’s just downright addictive. Salty, tangy, cheesy, crispy – check, check, check, and CHECK!
- Dietary-Friendly Dream: These beauties are naturally low-carb and keto-friendly, making them a fantastic option when you want something super satisfying without a carb overload. But honestly, they’re just plain delicious for everyone, diet or not!
What You’ll Need: Ingredient Breakdown
The shopping list for these is wonderfully short and sweet:
- Sharp Cheddar Cheese: 3 cups, shredded. Go for a good quality sharp cheddar for the best flavor punch! Pre-shredded is totally fine to save time.
- Dill Pickle Slices: 12 thin slices. Your favorite brand will do, just make sure they’re dill, not sweet!
- Smoked Paprika: ½ teaspoon. This adds a lovely subtle smokiness. If you only have regular paprika, that works too.
- Garlic Powder: ¼ teaspoon. Just enough for that savory hint.
Let’s Get Baking: Step-by-Step Instructions
Ready to make some magic? Here’s how:
- Preheat and Prep: First things first, get your oven preheating to 390°F (199°C). Line a large baking sheet with parchment paper – this is essential for easy cleanup and to stop any sticking!
- Dry Those Pickles!: Lay out your pickle slices on a layer of paper towels. Gently pat them with another paper towel to soak up as much of that extra moisture as possible. Don’t skip this step – it’s the secret to maximum crispiness and making sure the cheese hugs those pickles perfectly.
- Season Up the Cheese: In a medium bowl, toss your shredded cheddar cheese with the smoked paprika and garlic powder. Just give it a good mix until those spices are nicely distributed.
- Form Your Bites: Now for the fun part! Divide your seasoned cheese mixture into four equal portions – that’s about ¾ cup of cheese for each. On your parchment-lined baking sheet, shape each portion into a round or a sort of rustic rectangle, maybe 4-5 inches across. Make them relatively flat and leave a little space between them, as they’ll spread a bit while baking.
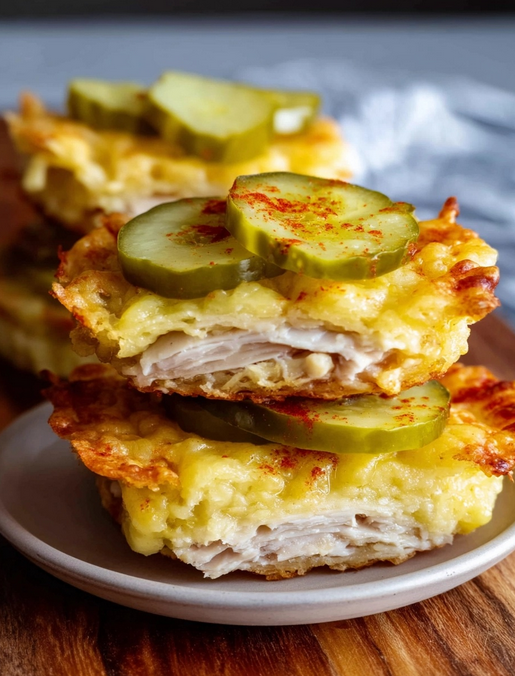
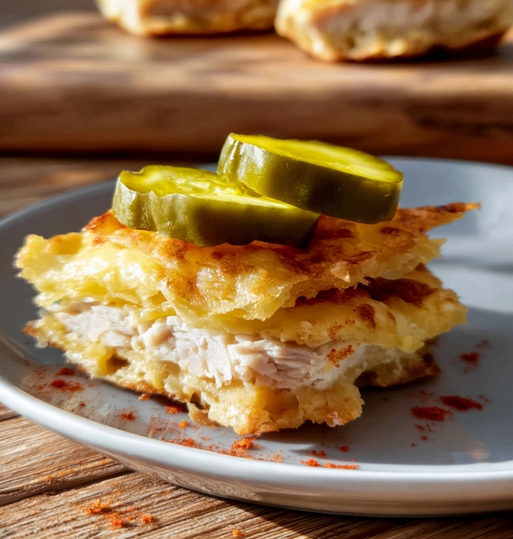
- Pickle Power: Neatly arrange 3 of your dried pickle slices on top of each cheese mound. Press them down gently so they feel snug and secure.
- Bake to Golden Glory: Carefully slide that baking sheet into your preheated oven. Let them bake for 18-23 minutes. You’ll want to keep a close eye on them, especially during the last few minutes, as cheese can go from golden to oops pretty quickly! They’re ready when the cheese is all melted and bubbly, and the edges are beautifully golden brown and look delightfully crispy.
- The Crucial Cool-Down: Once they’re baked, take the baking sheet out of the oven and – this is important – let the Cheesy Pickle Bites cool completely on the parchment paper right there on the baking sheet. Give them at least 10-15 minutes. They will become SO much firmer and achieve that signature crunch as they cool. Trust me, resist the urge to snatch one while they’re hot and molten; they’ll be fragile!
- Serve and Devour: When they’re fully cooled and beautifully crisp, gently peel your Cheesy Pickle Bites from the parchment paper. Serve them up immediately as is for a truly fantastic snack, or get creative and load them up with your favorite toppings (ideas below!).
My Expert Tips for Pickle Perfection
A few little pointers to make sure your Cheesy Pickle Bites are legendary every single time:
- Pickle Quality Counts: Using good quality, thinly sliced dill pickles really does make a difference. And just one more time for the people in the back: dry those pickles thoroughly!
- Cheese Freedom: Sharp cheddar is my go-to for that awesome tangy flavor, but feel absolutely free to experiment! Colby Jack, Monterey Jack, or even a spicy pepper jack blend would be delicious. Just make sure it’s a good melting cheese.
- Spice It Up (Or Down): Not a huge fan of smoked paprika? Regular sweet paprika is fine, or for a tiny bit of heat, a pinch of cayenne pepper mixed in with the cheese would be amazing!
- Parchment is Your Pal: Seriously, don’t even think about making these without parchment paper. It’s a lifesaver for preventing sticking and makes cleanup a total breeze.
- Oven Quirks: Remember, all ovens are a little different, and cheese types can vary in how they melt and brown. The first time you make these, keep an especially watchful eye to nail that perfect golden-brown crispiness.
- Storage Smarts: If you somehow have leftovers (highly unlikely!), you can store them in an airtight container at room temperature for a day, or in the fridge for up to 3 days. To bring back some of that glorious crispness, I recommend a quick reheat in a toaster oven or an air fryer for a few minutes.
Serving & Pairing Ideas – Let’s Get Fancy (Or Not!)
These Cheesy Pickle Bites are rockstars all on their own, but here are a few ways to dress them up or pair them:
- Dip ‘Em: Serve with a side of creamy ranch dressing, a zesty garlic aioli, spicy sriracha mayo, or even a cool dollop of guacamole.
- Mini Appetizer Bases: Use them as a crunchy, flavorful base for mini appetizers! Top with a small slice of cooked turkey or ham, a sliver of fresh tomato, or a tiny dollop of cream cheese and a sprinkle of fresh dill.
- Snack Attack Platter: Add them to a charcuterie board or a snack platter with some olives, nuts, and fresh veggies.
- Perfect Pairings: For drinks, a crisp, light beer, a chilled glass of Sauvignon Blanc, or even a tall glass of unsweetened iced tea would be fantastic.
They’re truly perfect for game days, casual get-togethers, an after-school (or after-work!) snack, or honestly, just because you deserve something amazing.

Viral Cheesy Pickle Bites: The Ultimate Low-Carb Crunch
Equipment
- Baking sheet
- Parchment paper
- Paper towels
Ingredients
Core Components:
- 3 cups shredded sharp cheddar cheese
- 12 dill pickle slices thinly cut
Flavor Boosters:
- ½ teaspoon smoked paprika
- ¼ teaspoon garlic powder
Optional Accompaniments for serving:
- Slices of cooked turkey ham, or chicken
- Fresh tomato slices
- Thinly sliced cucumber or bell peppers
- Slivered red onion
- Dollops of cream cheese or guacamole
- A sprinkle of fresh dill or chives
Instructions
- Preheat and Prep: Set your oven to 390°F (199°C). Line a large baking sheet with parchment paper for easy cleanup and to prevent sticking.
- Dry the Pickles: Arrange the pickle slices on a layer of paper towels. Gently pat them with another paper towel to absorb as much surface moisture as possible. This step is crucial for achieving maximum crispiness and ensuring the cheese melds perfectly with the pickles.
- Season the Cheese: In a medium bowl, combine the shredded cheddar cheese with the smoked paprika and garlic powder. Toss them together until the spices are evenly distributed throughout the cheese.
- Form the Bites: Divide the seasoned cheese mixture into four equal portions (about ¾ cup each). On the prepared baking sheet, shape each portion into a round or rectangular "bite," approximately 4-5 inches in diameter or length. Ensure they are relatively flat and spaced a couple of inches apart, as they will spread slightly while baking.
- Add Pickles: Neatly arrange 3 of the dried pickle slices on top of each cheese mound, pressing them down gently to adhere.
- Bake to Golden Perfection: Carefully transfer the baking sheet to the preheated oven. Bake for 18-23 minutes. Keep a close eye on them, especially towards the end of the baking time. The Cheesy Pickle Bites are ready when the cheese is fully melted, bubbly, and the edges are golden brown and crispy.
- Cool Completely: Once baked, remove the baking sheet from the oven. Let the Cheesy Pickle Bites cool completely on the parchment paper on the baking sheet for at least 10-15 minutes. They will become significantly firmer and achieve their signature crunch as they cool. Avoid moving them while they are hot, as they will be delicate.
- Serve and Enjoy: When fully cooled and crisp, gently peel the Cheesy Pickle Bites from the parchment paper. Serve immediately on their own for a fantastic snack, or get creative by topping them with your favorite optional accompaniments.
Notes
- Pickle Power: Using good quality, thinly sliced dill pickles works best. Remember, the dryer the pickles, the crispier your bites!
- Cheese Choices: While sharp cheddar is recommended for its robust flavor, feel free to experiment with other good melting cheeses like Colby Jack, Monterey Jack, or a blend.
- Don't Skip Parchment: This is a must! It prevents sticking and makes removal a breeze.
- Watch Closely: Oven temperatures and cheese types can vary. Monitor the bites to achieve your desired level of crispiness without burning.
- Cooling is Key: Patience during the cooling process is rewarded with the perfect crunchy texture.
- Storage: Store any leftover Cheesy Pickle Bites in an airtight container at room temperature for up to 1 day, or in the refrigerator for up to 3 days. For best results, reheat briefly in an oven or air fryer to restore crispness.
- Calories: 693 kcal
- Protein: 39.2 g
- Total Fat: 56.8 g
- Saturated Fat: 32.1 g
- Monounsaturated Fat: 15.3 g
- Polyunsaturated Fat: 2.4 g
- Carbohydrates: 7.0 g
- Dietary Fiber: 0.5 g
- Total Sugars: 1.2 g
- Sodium: 1473 mg
- Cholesterol: 167 mg
- Potassium: 183 mg
- Calcium: 1222 mg
- Iron: 0.5 mg
- Vitamin A: 502 µg RAE
- Vitamin C: 0.4 mg
Go On, Give Them a Try!
Honestly, these Viral Cheesy Pickle Bites have become such a beloved, quick-fix snack in my house. They’re just so incredibly easy to whip up and the payoff in flavor and crunch is HUGE. I have a feeling they’ll become a fast favorite for you too!
If you do give them a try, I’d be absolutely thrilled to see how they turn out! Snap a picture and tag me on [Your Social Media Handle Here] – I can’t wait to see your cheesy, pickly creations! Happy snacking!

")
")
")

